Introduction: How to Add a Simple WordPress Copy Code Button
Every user who reads a code tutorial needs a Copy Code Button. Without it, they must awkwardly select, scroll, and copy text. Many plugins add a WordPress Copy Code Button, but they are often bundled with heavy syntax highlighting. This tutorial offers a simple, lightweight alternative. It ensures speed without bloat. I will provide the finished code for you to use immediately. I will also show you how to use AI tools like Gemini to generate similar code. This is an important skill for future customization. Finally, we will cover follow-up prompts to check the code. These prompts ensure the solution is safe, secure, and future-proof. Let’s get started.
Generating the code for a Simple WordPress Copy Code Button
I’ve already done this for you (see below), but you can use a prompt like the one below in most LLMs like Copilot or Gemini. You can change the website and the prefix below.
"Create a simple WordPress plugin that adds a 'Copy Code'
button to all <pre><code> blocks.
The plugin should consist of a PHP file to enqueue assets, and separate JavaScript and CSS files. The JavaScript should detect all pre blocks containing code and append a 'Copy' button. When clicked, the button should copy the innerText of the code block to the clipboard and temporarily change its text to 'Copied!'. The CSS should style the button, positioning it in the top-right corner of the code block. Use 'lde-copy-button' as the prefix for all relevant class names and JavaScript handles, and 'https://www.les-ey.online' as the author URI."
Installing the Simple WordPress Copy Code Button
Step 1: Download or copy the code and add it to a zip file
Download the ready-made plugin file here
or
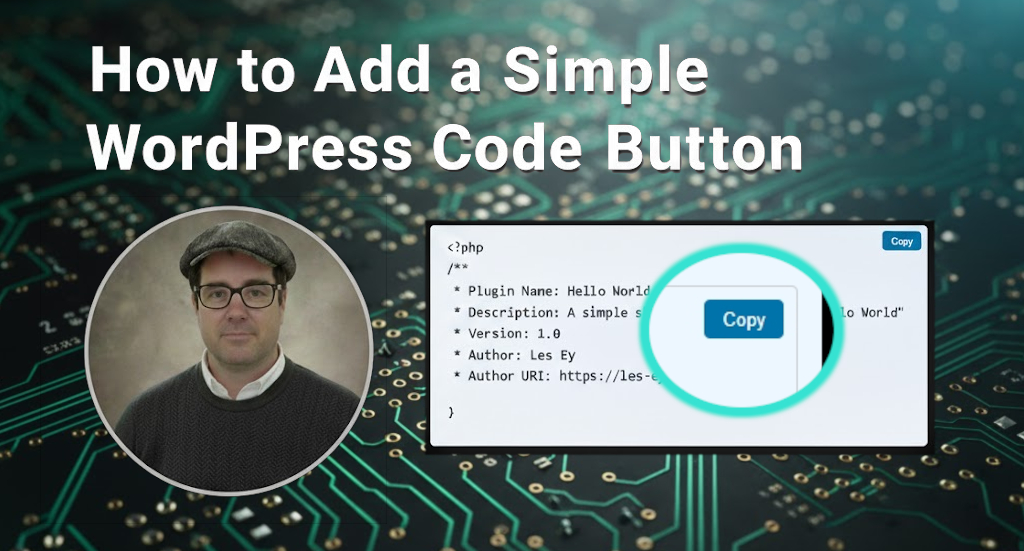
Copy the code into 3 separate files and move them into a zip folder called my-simple-copy-code-button.zip. The code will insert a copy button at the top right-hand corner of code boxes. (You can see them in use on this page.) If you don’t like the color of the button, then edit the CSS file to change it.
Files
<?php
/*
Plugin Name: My Simple Copy Code Button
Description: Adds a copy button to code blocks in posts and pages.
Version: 1.0
Author: Les Ey
Generated by copilot
*/

function my_simple_copy_code_enqueue_scripts() {
    // Load the JavaScript and CSS files for the copy button
    wp_enqueue_script('my-simple-copy-code-script', plugin_dir_url(__FILE__) . 'my-simple-copy-code.js', array(), null, true);
    wp_enqueue_style('my-simple-copy-code-style', plugin_dir_url(__FILE__) . 'my-simple-copy-code.css');
}
// Hook into WordPress to load scripts on the front end
add_action('wp_enqueue_scripts', 'my_simple_copy_code_enqueue_scripts');
// This script finds all <pre><code> blocks and
// adds a "Copy" button to each
document.addEventListener("DOMContentLoaded", function () {
document.querySelectorAll("pre code").forEach(function (block) {
const button = document.createElement("button");
button.innerText = "Copy";
button.className = "my-simple-copy-code-button";
// When clicked, copy the code text to the clipboard
button.addEventListener("click", function () {
navigator.clipboard.writeText(block.innerText).then(() => {
button.innerText = "Copied!";
setTimeout(() => (button.innerText = "Copy"), 2000);
});
});
// Position the button inside the code block container
block.parentNode.style.position = "relative";
block.parentNode.appendChild(button);
});
});/* Style for the copy button — feel free to customize */
.my-simple-copy-code-button {
position: absolute;
top: 8px;
right: 8px;
padding: 6px 12px;
background-color: #0073aa;
color: white;
border: none;
border-radius: 4px;
cursor: pointer;
font-size: 12px;
}
.my-simple-copy-code-button:hover {
background-color: #005177;
}
Step 2: Check that the plugin is safe to use
It’s crucial to always vet any code or plugin before installing it from the internet. Even trusted websites can be hacked. You can effectively use AI tools like Gemini for this. Copy the code into the Gemini prompt field and ask it to ‘standby for instructions then paste in the following prompt (or a similar one to suit your own requirements). It will analyze the code for security vulnerabilities, performance issues, and best practices. While AI analysis may highlight minor details, focus on understanding its core findings regarding significant risks. No system offers 100% certainty, but diligent checking drastically reduces your exposure to potential threats.
Review the following code for:
1) Safety (security vulnerabilities, injection risks, unsafe input handling, misuse of globals or eval, race conditions)
2) Backward compatibility (supported runtimes/framework versions, deprecated APIs, breaking changes for existing integrations, assumptions about environment or config)
3) Future proofing (modularity, extensibility, namespacing, clear boundaries, upgrade paths, maintainability, testability)

Instructions:
- Identify concrete issues and risks, citing specific lines or snippets.
- Propose minimal, practical fixes with a brief rationale if required.
- Note any version or environment constraints that matter.
- Keep recommendations prioritized: High, Medium, Low.

Finally, provide a simple summary (2–3 sentences) of what the code does, in plain language.
While Gemini will provide a logical answer, remember that it is a machine and will not anticipate every issue you may encounter. So, testing and refinement may be required depending on the complexity of the code you are working with. Gemini should be able to give feedback on well-known plugins.
Step 3: Upload and install the plugin
See Easy Guide to Installing a Custom WordPress Plugin
Got Questions?


Views: 192